PHP error logs are one of the most useful tools for diagnosing web hosting issues. It’s often difficult to find the cause of unexpected behavior in WordPress® and other PHP applications. PHP error logs, including WordPress logs, can help you to spot problems and identify the offending plugin, theme, or custom code.
In this article, we describe what PHP error logs are and why they’re useful, before explaining how to use cPanel & WHM to activate and configure both WordPress logs and the PHP runtime’s logging functionality.
What is a PHP Error Log?
A PHP error log lists warnings and error messages, which are generated by the language runtime and saved to a file. WordPress is written in PHP, so it handles WordPress’s error messages and logging.
Errors occur for lots of reasons. A line of code might have a typo in it, or the code might be fine, but something unexpected happens when it’s executed. Either way, the developers want to let you know, so they write code to log a message to a file. Error logs are a time-ordered list of these messages.
Error logs are incredibly useful for figuring out why WordPress isn’t behaving as you think it should. If it’s consuming excessive server resources, a plugin is broken, or pages don’t load, the logs can tell you why. If you’re in a “White Screen of Death” situation where WordPress isn’t working at all, the logs might be the only way to see what’s going on under the hood.
How to Monitor WordPress Logs in cPanel
Before you can troubleshoot with logs, you’ll need to tell WordPress or PHP to start logging. Error logs are off by default because logging consumes server resources. They can also be a security risk if the wrong person sees them; logs sometimes have clues about potential vulnerabilities.
We’re going to look at two approaches to configuring error logging in cPanel. They are:
- Activating WordPress logging via the wp-config file.
- Activating PHP logging via the php.ini file.
Both can be done quickly in cPanel & WHM.
WordPress Error Logs with Wpconfig.php
The wp-config.php file contains WordPress’s configuration, and, with a couple of lines of code, you can turn on debugging mode and tell WordPress to write errors to a log.
First, fire up cPanel’s File Manager, which you will find in the main page’s Files section.
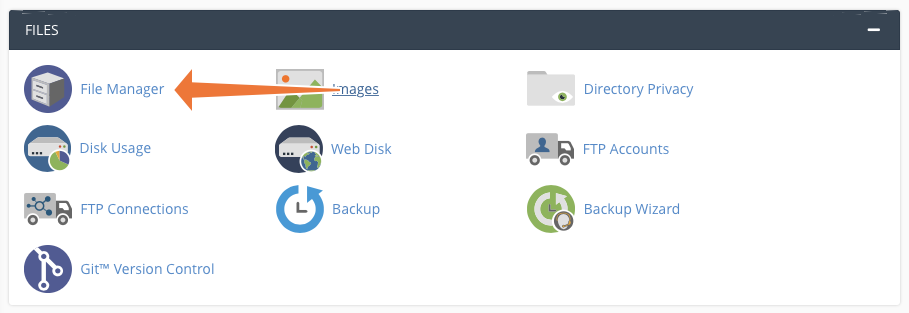
Your WordPress site is probably in the root or a subdirectory of public_html, although it might be somewhere else if your server has a non-standard configuration.
Click on the directory containing the site and find the wp-config.php file in the right-hand pane. Select it and click Edit in the menu bar.
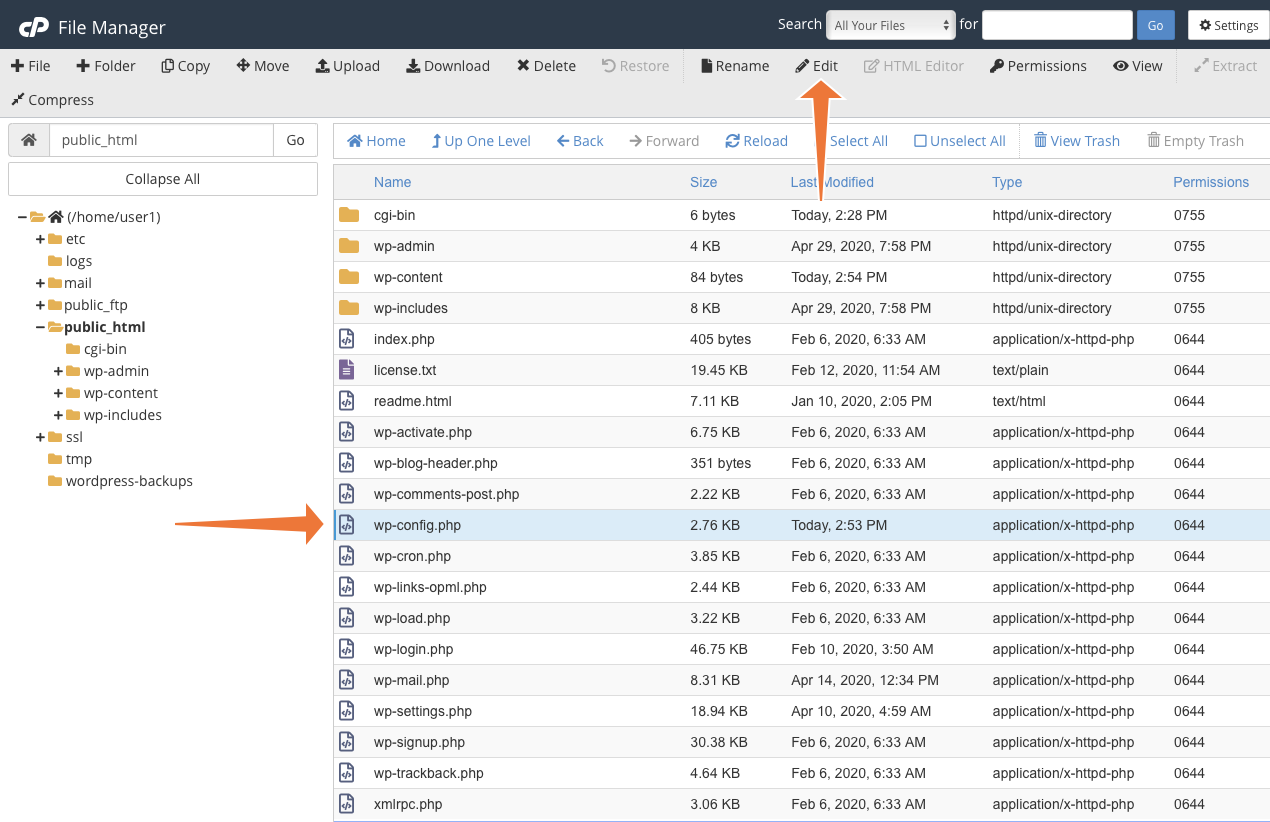
The file opens in cPanel’s text editor. Scroll down to the line that reads:
/* That's all, stop editing! Happy blogging. */Add the following code above that line and then click Save:
define( 'WP_DEBUG', true );
	define( 'WP_DEBUG_LOG', true );
	define( 'WP_DEBUG_DISPLAY', false );
@ini_set( 'display_errors', 0 );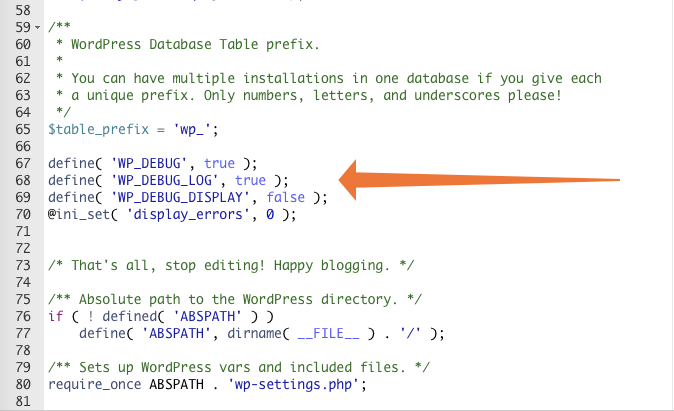
We’re telling WordPress to turn on debugging mode and output error messages to the log file. We also tell it not to display errors in the interface, because that’s not a good look for a production website.
WordPress will now write error messages to a file called error.log in the wp-content directory, which is in the root directory of your WordPress site.
You can use the cPanel File Manager and text editor to open this file and see the error messages. The most recent messages are at the bottom of the file. They tell you the type of error and which code triggered it, allowing you to track down the plugin or theme file responsible.
When you have diagnosed the problem, be sure to delete the logging code you added to the configuration file. The error file will keep growing and will eventually consume a large chunk of your disk allocation.
How To Log PHP Errors Beyond WordPress
The method outlined above is great if you want to manage logging through WordPress, but what if you want to log errors for other content management systems and applications?
To achieve widespread logging, you can add code to the php.ini file, which you can edit in cPanel’s MultiPHP INI Editor. You will only be able to edit this file if your web hosting environment allows it.

Select the Editor tab and then a location in the dropdown menu. cPanel displays the existing configuration file, which may be blank.
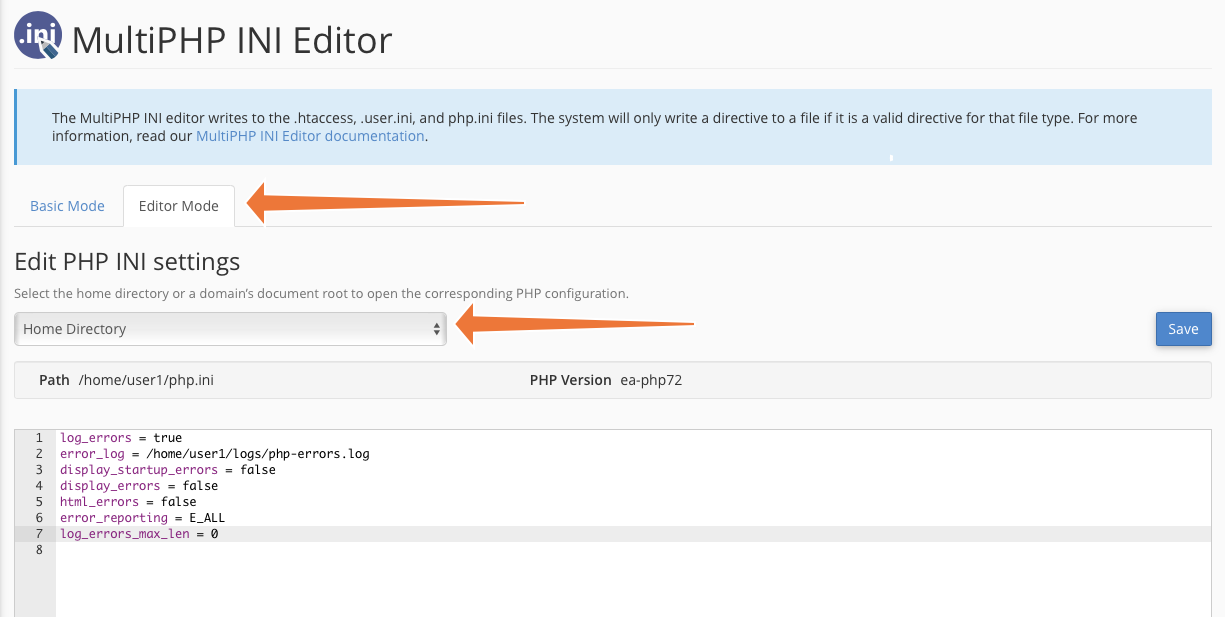
Add the following to the text entry field and click Save.
log_errors = true
error_log = /home/user1/logs/error.log
display_startup_errors = false
display_errors = false
html_errors = false
error_reporting = E_ALL
log_errors_max_len = 0
These directives tell the runtime to log errors to the file designated with error_log, which you should change to your preferred location. We’ve turned off startup errors because they are rarely relevant for debugging misbehaving applications. We also instruct PHP not to display errors in web pages because we don’t want users to see them.
Click Save, and PHP will start to log errors to the file you chose. You can access the log via the cPanel File Manager or by logging in with SSH.
The php.ini directives we used are suitable for most web servers, but you can use many other directives to configure PHP. To learn more, take a look at the list of php.ini directives in the language’s documentation and our MultiPHP INI Editor documentation.
Once you have used the logs to figure out your issue’s source, remove the code you just added or change the log_errors value to false to deactivate logging.
Efficient Issue Resolution with PHP Error Logs and cPanel
Logs are an enormously useful tool for diagnosing and fixing unexpected behavior in WordPress sites and other web applications. With cPanel & WHM, it’s straightforward to activate and deactivate logging, reducing the time you spend hunting down elusive issues.
As always, if you have any feedback or comments, please let us know. We are here to help in the best ways we can. You’ll find us on Discord, the cPanel forums, and Reddit.

