Hey everyone!
This post is meant to be a brief overview for using the WHM API. We’ll explore two methods of using the API – from a browser and from a Perl script on the command line.
Finding out what you can do with the API
You can view a list of all the Available Functions for the API calls at http://documentation.cpanel.net/disp…ions-Functions. We’ll reference this page later when we’re constructing our API commands. You can also get specific details about each function by clicking the item, such as the adddns function at http://documentation.cpanel.net/disp…API+1+-+adddns which we’ll be using throughout this guide as our example.
Using the API in a Browser and Constructing the API URL
The easiest way to get familiar with the cPanel API is to call a function using your browser. Just like visiting a website by entering a URL, you can enter a URL that will perform API calls. During your use of the WHM interface you’ve likely noticed additional data after the typical URL of https://x.x.x.x:2087 and we can manipulate that data to perform administrative functions on the server. Although calling functions using the API may seem redundant since you’re already logged into WHM, and thus have full access to the interface and available GUI tools, it will let you see if your API call works as you expect and gives you some helpful output (in either JSON or XML format, whichever you prefer) if you do run into problems.
Here’s an image that shows the basic formatting of an API call – this looks a lot like the familiar WHM login of https://x.x.x.x:2087 but just includes extra data after the session ID.

***NOTE***
The following methods assume you’re already logged in to WHM as root and have a security token. This means that you’ll have a unique, 10-digit session ID in the format of https://x.x.x.x:2087:cpsess##########. In the following examples I’ll just use the localhost IP of 127.0.0.1 and cpsess########## to avoid confusion so be sure to edit these commands with the appropriate details for your own server if you want to try these out for yourself.
**********
Using the URL
Now that we have a basic idea of what the URL should look like, let’s perform a basic task with the API – creating a DNS zone. According to the functions page listed earlier in this guide we’ll want to use the “adddns” function. If we follow the URL formatting guide above and the layout details from the function guide at http://documentation.cpanel.net/disp…API+1+-+adddns we can construct our URL to look like this:
https://127.0.0.1:2087/cpsess##########/json-api/adddns?api.version=1&domain=example.com&ip=127.0.0.1
If we analyze this command using the above URL breakout image we have the following areas::
-The “output format” is JSON
-we’re using the “adddns” function
-The API version we’re using is version 1
The rest of the command is the variables that the function requires to operate. I’ve just used “example.com” for the domain to create and I’m setting it up on the IP of 127.0.0.1
Now, assuming we’re already logged into WHM, we can enter that command in our browser – you should receive JSON output that looks similar to the following, but depending on your browser this could be all displayed on one line.
{
   metadata: {
      result: 1,
      version: 1,
      reason: 'Added example.com ok belonging to user root',
      command: 'adddns'
   }
}
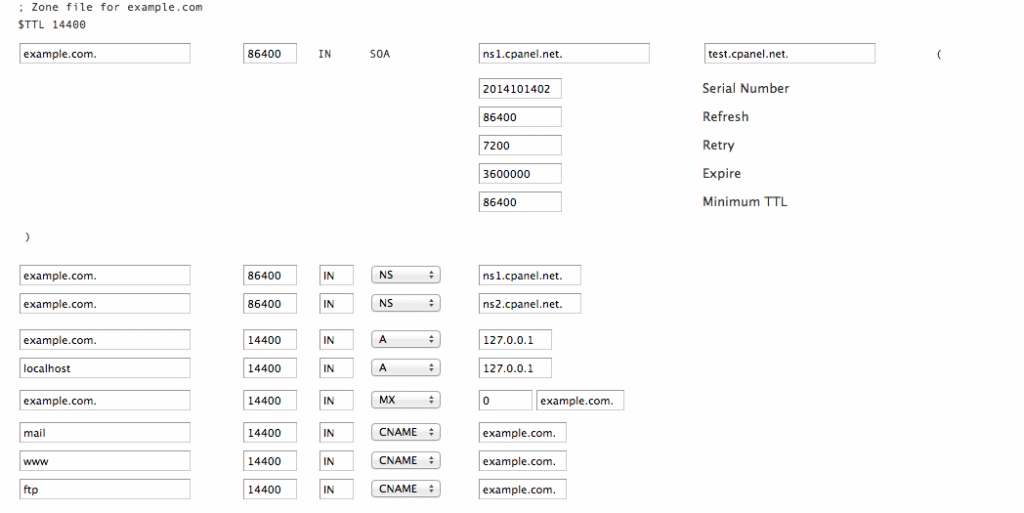
In general, when working with JSON, “1” indicastes positive output, meaning the action completed successfully. We can see from this output that the domain was accepted and example.com has been created on the server. If we check out WHM >> Edit a DNS Zone you should see example.com in your list now, and selecting it will show a zone file with all the default cPanel records:

Using Custom Code for API Calls
The second way to interact with the cPanel API is to call the API functions through custom code. When writing your own code there are many options limited only by your creativity. The examples here are just that – examples to show you the basics so you can see how the API code functions within a Perl script. They are by no means exhaustive in any way.
Prerequisites
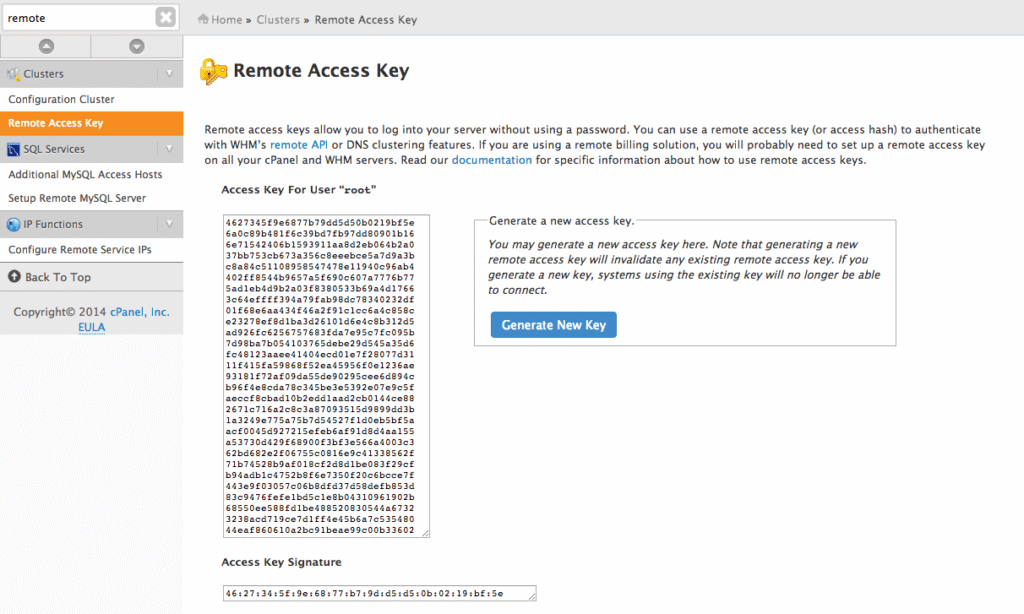
Since this code will be called from a file we need to have a way to interact with WHM so we use an access hash so our commands are authenticated just as if we were clicking items in the WHM interface. An access hash is a way for a program to access a server without having to use the root password. This hash is used for several things in the cPanel system, most notably setting up DNS Clusters. To create this hash you can visit WHM >> Remote Access Key. There is likely a key already in place on your server – if this is the case it’s best to just use what already exists. If there isn’t a key in place you can generate one with the blue “Generate New Key” button on the right.

That long string of text is what we’ll need to use in our file. You can also find that at /root/.accesshash. We’ll need to add that block to line 14 of the code in the example below.
Since we’re working with Perl we’ll also need some of the standard Perl modules installed on the server. You’ll want to run the following two commands to get these modules installed:
yum install perl-XML-Simple
/scripts/perlinstaller LWP::Protocol::https
Building the Code
Now that we have the access hash we can use that in our code to authenticate our script to make an API call. Just like in our first example, here is some code that will create a DNS zone for example2.com. I’m using example2.com since we already created example1.com in our previous test. You can copy and paste the following code into a file named dns-example.pl using your favorite text editor. The file is named with the “.pl” extension because it is a Perl script. It looks like there is a large amount of code necessary to create a DNS zone, but much of this is just the access hash.
#!/usr/bin/perl
use strict;
use warnings;
use LWP::UserAgent;
use XML::Simple;
use Data::Dumper;
use HTTP::Cookies;

$ENV{PERL_LWP_SSL_VERIFY_HOSTNAME} = 0;

my $hostname = 'localhost';
my $protocol = 'https';
my $accesshash = <<'END';
a1afa058158ada545f9cd9c0bb3cde63
0baa595074c2e42e2f8513103688eb6c
bb6c343a05826b6b6e300b77e566b876
de4c14ad947efc3d27566c5bc69caeea
4edcb02301fb87b49bcf2e7ccfb4184a
b42b83f41ded645c7c9061ab369bddc9
c786062777d7832e123a8334f56aef3e
4388f368249022cabde665d7261ab88a
70d030daefafdaead1ce815e98558d6c
cb7bbc1052a60df4ed110e0c0f909bd6
efc43e9923542e290fc6209d038adae9
bee24339bf9d849fcd78c50d29474193
dfeb9de9f979cb06e90d3d66b618369d
180ae4382550a177316f872254739990
8b5de8ab871029a47f29ccd90ee5e52f
b12bf41f37de3ead8cdd26027d50364d
1a6df8c0f2d29ecd29aab9254eeb6808
d232f1e729453a5a5de27e276e9bba1d
8a27ba0d4690af299d4e461757bfa412
1a0bb3474b46d14926ff7351a1d2d550
b19351d670c82c82cfdf661ed7effc8d
530af69720062aa62e48ea5c45261691
d2c49b4def5f2e47beac5f796304a024
4ecb921948a8c77c00d78a4fee6e8743
7430731106a8f56e2853798533672868
d92f2eb9b9444492ac2701f1367e0b9f
843078ac419a2e6a90342848f756edde
1dfb59a5fdfed2ad8954ec3c2ee7b868
2c9aa7f30d722a566d755b54778c6a96
END
$accesshash =~ s/n//g;
my $useragent = LWP::UserAgent->new(
cookie_jar => HTTP::Cookies->new,
);
$useragent->default_header( 'Authorization' => "WHM root:$accesshash" );
 my $url = "$protocol://$hostname:2087/json-api/adddns?api.version=1&domain=example2.com&ip=127.0.0.1";
 my $response = $useragent->get($url);
 my $response_data = $response->decoded_content;
 print $response_data;
When you go to use this code you’ll need to replace lines 14-42 with your own access hash. There are also ways to have the script read the access hash directly from the server but that level of programming is beyond the scope of this guide.
To better understand what is happening in this code, here is a line-by-line description:
Lines 1-48: Creates the user agent and declares variables, including the access hash
Lines 49-51: The actual API code
Line 52: The output from the code
You’ll also need to make sure the script has executable permissions so it can run on the server. After you’ve saved the file with all of your changes you can issue the following command from shell to change the permissions so the script can be executed
chmod 755 dns-example.pl
If this code were being used in a production environment the “&domain=example2.com” and the “&ip=127.0.0.1” sections would ideally be variables that get their values from data entered by a user through some type of form. However, since we’re just providing an example of how the code works outside of a working graphical interface they’ll need to be hard-coded.
Executing the Script
Once you have the file saved you can execute it by running the following command:
/usr/bin/perl dns-example.pl
If everything goes well you should get output that looks similar to the following:

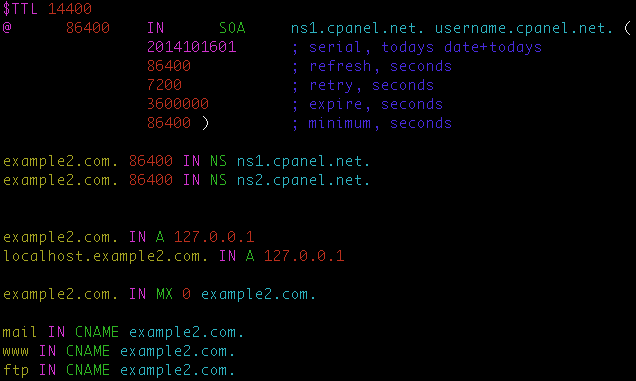
Just as with the previous JSON results, seeing “1” in the output indicates that the action completed successfully. If you check your /var/named/ directory you should see the DNS zone file for example2.com.db which looks like this:

I hope that gives you an idea how the WHM API works and that you found these examples useful!
